All wine cellars need an HVAC system that can meet their refrigeration needs. Each wine cellar has different requirements. M&M Cellar Systems has a wide range of experience in the installation of all kinds of wine cellar refrigeration equipment. In this article, expert cooling unit installer Mario walks us through the installation of a particular type of HVAC system for a residential wine cellar. Learn how to install a split system cooling unit from our specialists!
M&M Cellar Systems and Our Role in Every Project
Mario Morales, the founder and lead technician of M&M Cellar Systems has more than a decade of experience in the wine cellar industry. He understands very well what wine enthusiasts need. Show him any wine cellar, and he can take a quick look at it, and he’ll already know what the best cooling system to install.
Mario believes that among the many roles of an HVAC technician, the most important is knowing what refrigeration unit to install. At M&M Cellar Systems, we make sure that we consider the design of the wine room so that we can select the most appropriate cooling equipment for that particular design.
Deciding on What Cooling System to Install
There are many factors considered when choosing the right refrigeration system for a wine cellar. In this particular project, we chose to install a split system cooling unit. Here’s why:
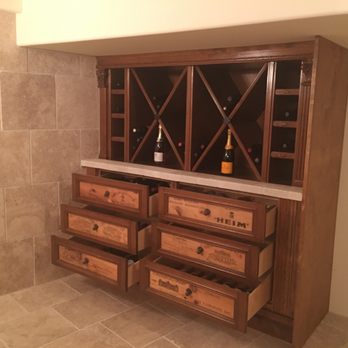
Residential wine cellar where the team from M&M Cellar Systems installed a split system cooling unit
1. No Space Above the Cellar for Cooling Unit Installation
The house had two stories, and the wine cellar had a second floor right above it. This meant that there wasn’t room for any installation above the wine cellar. So, any refrigeration we installed had to be inside of the cellar.
2. The Wine Cellar Was Situated in the Middle of the House
Another consideration was noise. Since the wine cellar was right in the middle of the house, we couldn’t install noisy equipment. A split-type cooling unit operates silently because the noisy component (condenser) of an HVAC system is placed outside. Only the evaporator is installed inside the cellar.
In other cases, a self-contained unit would have been another option. However, self-contained units need a room to vent out hot air. The wine cellar in this project was located in the middle of the house, so installing a self-contained system on any of its walls would mean putting our heat into the living space surrounding the cellar.
The Step-by-Step Process of How to Install a Split System Cooling Unit
With these factors considered, it was clear that the best choice was to install a split system cooling unit. More specifically, installed a split-type configuration with two evaporator coils inside the cellar and one condenser unit outside the house. Here’s how we set it up:

Our team laid down this concrete slab for the condenser unit to be mounted on.
Step 1: Lay A Concrete Pad Outside
This concrete pad is where the condenser will be sitting. Our team prepared this concrete pad outside the house where the condenser was going to be set up.
Step 2: Install the Line Set
Our teams set up set up the refrigeration lines. These lines run from the condenser unit going to the evaporator coil inside the wine cellar.
Step 3: Set Up Power Source
Above the line set, we had disconnect switches installed. These will feed power to the condenser unit. Some cities require disconnect switches, while some cities are more lenient. An outlet will do if a disconnect switch is not required.
Step 4: Mount the Evaporator Coil Inside the Wine Cellar
Our team mounted the evaporator coils into the recessed soffit in the ceiling of the cellar. We used two CTI-35 evaporator coils in this project instead of one, because of the size of the wine cellar. For us to get the full cooling capacity required for this size of cellar, one huge evaporator coil is needed. However, the lack of space in the ceiling does not permit one big coil. Two smaller coils were the ideal route for us to achieve the required cooling capacity.

Small soffit in the wine cellar ceiling where the evaporator coil will be installed.
The team also set up an access port for pressure testing, which will be performed in Step 7.
Step 5: Configure the Condensation Pump and Drain
Sitting below these evaporator coils were stainless steel draining pans. These pans collect condensation drips and take them out through the primary drain.
This kind of refrigeration unit came with a mini condensate pump that was from its manufacturer. In this project, our team took out the condensate pump and replaced it with a gravity drain. This drain removes all collected condensation from the steel pans.
A gravity drain is always our recommended drain. The client in this project allowed us to install a gravity drain. In other cases, when it’s not possible to install a gravity drain, we either stick to the mini condensate pump or install a standard condensate pump.
Step 6: Setup the Outdoor Enclosure
In between the concrete pad and the condensing unit, we installed a stainless steel base. This stainless steel base is the platform for the outdoor enclosure, which is necessary to protect all the components of the condenser. This outdoor enclosure is soldered at every point to make sure that the cooling system is completely sealed.

The enclosure protects the condenser unit and the lines from damage.
Step 7: Perform a Pressure Test
After every cooling system installation, we perform a pressure test to make sure that there are no leaks in the system. We pressurized this split system cooling unit installed with 200 psi of nitrogen.
In Step 4, we installed an access port when mounting the evaporator. This access port allows us to check the pressure in the evaporator coil versus outside at the condensing unit. The access port provides convenience and efficient use of time because if there is a need to adjust the expansion valve in the evaporator, we can do it without having to go outside to the condenser. Sometimes, there can be a 1 to 3 lbs. pressure drop if one has to transfer from the evaporator inside to the condenser outside. This pressure drop is because of the distance of the line set. It won’t always be accurate to read the pressure outside versus reading the pressure inside. This access port allows accurate pressure readings because we’re near the evaporator coil.
Need Help to Install a Split System Cooling Unit? Call Us!
With all the technicalities of installing a wine cellar refrigeration system, it is wise to entrust the installation process to an expert. We can help you install your split system cooling unit in your wine cellar! Give us a call today at (323) 578-3330!
More Wine Cellar Specialists in Orange County California
Bella Vita Wine Cellars
978 La Paz Rd,
Placentia, CA 92870
Business: +1 (714) 798-9858